Hip-Opening Yoga for People Who Sit All Day: 5 Poses to Release Tension

Hip-Opening Yoga for People Who Sit All Day: 5 Poses to Release Tension
Create a clean professional infographic illustration in a 3:2 landscape aspect ratio, full-bleed layout, modern flat vector style, soft wellness color palette of teal, blue, warm coral, and light cream, with bold sans-serif typography and clear visual hierarchy.

Top header across full width:
Large bold title text: "Introduction"
Subtitle text below: "Hip-Opening Yoga for Tight Hips"

Main composition in wide horizontal sections, not a vertical stack:

Left side hero visual:
A seated office worker at a desk with a tight lower back and hips highlighted in warm coral glow, plus a small yoga mat and stretching silhouette nearby. Add subtle icons of a laptop, chair, car, and books to show sitting all day. Include a small caption block beside the figure with the text:
"Long hours of sitting can tighten your hips"

Center section with three numbered feature blocks in a horizontal row, each in its own rounded rectangle with an icon:

1. Block with a hip joint / pelvis icon and the text:
"Why sitting causes tight hip flexors and glutes"

2. Block with a yoga pose icon and the text:
"5 specific yoga poses that target hip tension"

3. Block with a simple routine checklist icon and the text:
"A routine that is easy to follow and stick with"

Right side audience block:
A grid of small person icons representing office workers, remote employees, students, and drivers, with the heading:
"Who it's for"
and the text:
"Office workers • Remote employees • Students • Drivers"

Bottom band across full width:
A simple row of five pose placeholders shown as minimal yoga silhouette icons with numbered circles 1 through 5 above them, and a supporting text strip:
"No complicated sequences. No fancy equipment. Just 5 poses."

Use strong contrast, clean spacing, subtle shadows, and organized alignment. Keep all text crisp, readable, and exactly as written. No border frame, no poster mockup, no extra decorative clutter.

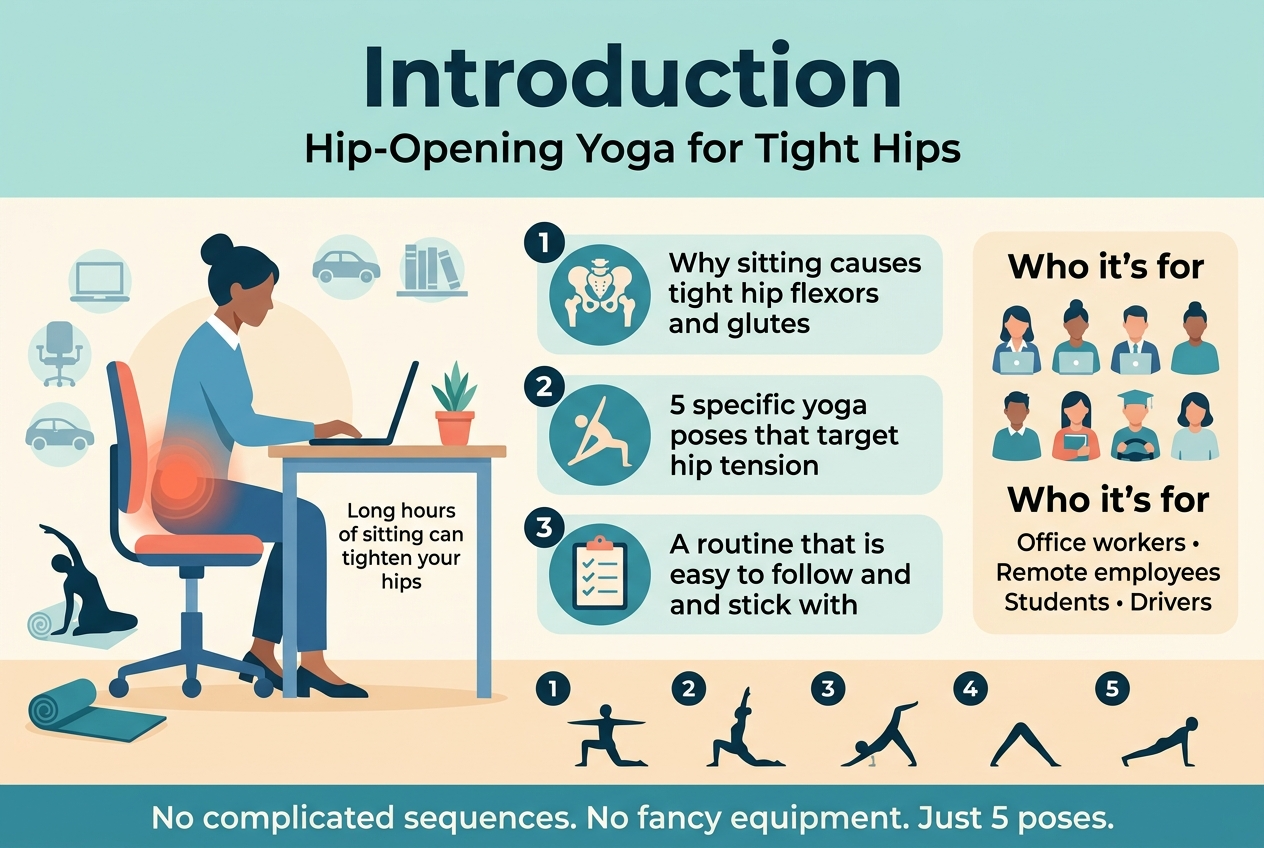
If you spend most of your day parked in a chair, your hips are probably tighter than you realize. I know this firsthand — after years of desk work, I started noticing that dull, achy feeling in my lower back and hips that just wouldn’t go away. That’s what pushed me to dig into hip-opening yoga, and honestly, it changed everything.

This guide is for anyone who sits for long stretches — office workers, remote employees, students, drivers — basically anyone whose hips are paying the price for a sedentary routine.

Here’s what I’ll walk you through: why sitting all day actually locks up your hip flexors and glutes, five specific yoga poses that target that tension directly, and how to string them together into a routine you’ll actually stick with. No complicated sequences, no fancy equipment — just five poses that work.

Why Sitting All Day Tightens Your Hips
Create a clean, professional full-bleed infographic illustration in 3:2 aspect ratio with a modern medical/fitness style. Use a light background with subtle blue and teal gradients, dark navy text, and orange accent highlights. Use a bold sans-serif title at the top spanning the width.

Top header:
- Large bold title centered across the top: "Why Sitting All Day Tightens Your Hips"
- Small subtitle beneath it in medium weight: "How prolonged sitting compresses hip flexors and limits mobility"

Main layout:
- Use three wide horizontal sections across the page, each with a left-side numbered circle icon and a right-side text block.
- Keep a clean multi-column infographic layout, not a narrow poster.

Section 1 on the upper middle left-to-right:
- Numbered circle icon "1" in teal with a simple seated figure icon.
- Heading: "Prolonged Sitting Compresses Hip Flexors"
- Short body text in two lines:
  "When I sit for hours, my hip flexors — especially the psoas — stay locked in a shortened position."
  "Over time, they become tight and less elastic, making hip extension harder when I stand or walk."
- Visual: a side-view human silhouette seated at a desk with the hip area highlighted in orange, showing a shortened psoas with a compressed arrow.

Section 2 in the center:
- Numbered circle icon "2" in orange with a chain-reaction or domino icon.
- Heading: "The Chain Reaction of Tension"
- Three connected mini callout blocks arranged horizontally with thin arrows linking them:
  - "Lower back" with a small spine/pelvis icon and text: "Pelvis tilts forward, straining the lumbar spine"
  - "Knees" with a knee joint icon and text: "Altered hip mechanics shift load unevenly"
  - "Core" with a core/stability icon and text: "Deep stabilizers switch off, back compensates"
- Add a visual line of dominoes from hip to back to knees to core, with the phrase centered above them: "It's one tight domino knocking over the next."

Section 3 on the lower middle:
- Numbered circle icon "3" in blue with an open-hip / posture icon.
- Heading: "Releasing Hip Tension Improves Alignment"
- Short body text in two lines:
  "When I open my hips regularly, my pelvis returns to a neutral position."
  "That shift takes pressure off my lower back, helps my core engage, and lets my knees track correctly."
- Visual: a standing human silhouette with hips highlighted in green, a level pelvis line, and clean alignment arrows upward through torso and downward through legs.

Bottom summary band across the full width:
- A soft teal banner with bold text: "Better alignment = less daily pain"
- Smaller line beneath: "Not just during yoga, but through every movement I make"
- Include three small icons spaced evenly: a relaxed lower back, a stable core, and aligned knees.

Typography and style:
- Use bold headings, medium-weight body text, and clear hierarchy.
- Keep text readable and concise, with ample spacing.
- Use simple flat vector shapes, subtle shadows, and medical infographic icons.
- No extra text beyond what is specified.

How Prolonged Sitting Compresses Hip Flexors and Limits Mobility

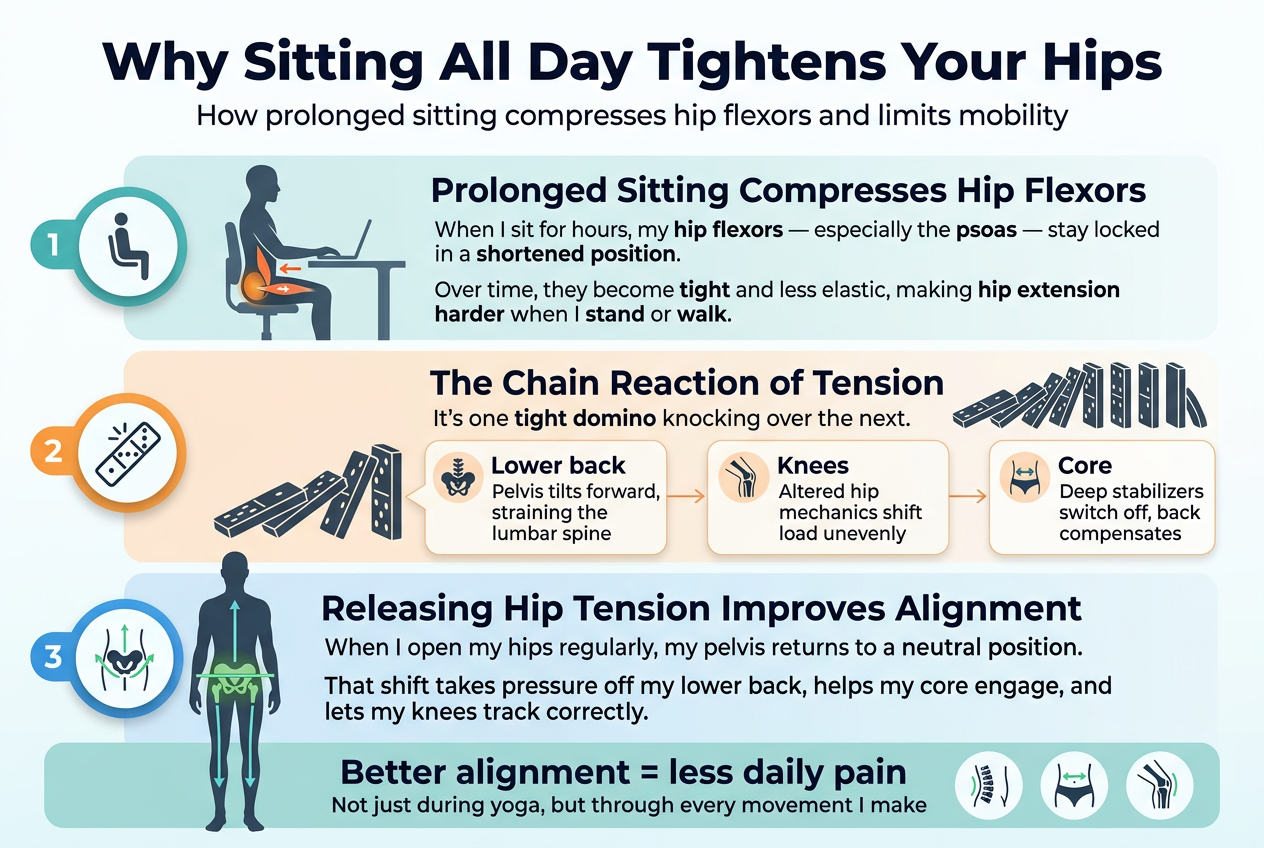
When I sit for hours, my hip flexors — especially the psoas — stay locked in a shortened position. Over time, they adapt to that compressed state, becoming tight and less elastic. This tightness makes it harder to fully extend my hips when I stand or walk, creating that stiff, hunched feeling I notice after a long desk day.

The Chain Reaction of Tension from Hips to Back and Knees

Tight hips never stay quiet — they pull everything around them out of alignment. Here’s what I see happen:

  • Lower back: My pelvis tilts forward, straining the lumbar spine
  • Knees: Altered hip mechanics shift load unevenly onto my knee joints
  • Core: My deep stabilizers switch off, leaving my back to compensate

It’s one tight domino knocking over the next.

Why Releasing Hip Tension Improves Posture and Reduces Pain

When I open my hips regularly, my pelvis returns to a neutral position. That single shift takes pressure off my lower back, lets my core engage properly, and helps my knees track correctly. Better alignment means less daily pain — not just during yoga, but through every movement I make.

What to Know Before You Start
Create a clean, modern full-bleed infographic in a 3:2 aspect ratio with a soft neutral background, teal and navy accents, and warm coral highlights. Use a bold sans-serif title at the top left: "What to Know Before You Start". Below the title, organize the content into four wide horizontal sections with clear icons, numbered labels, and balanced spacing across the page. Avoid a narrow vertical poster layout.

Section 1 on the upper left: a number badge "1" beside a simple body icon and a forward-fold pose silhouette. Heading: "How to Recognize Your Personal Hip Tightness Level". Include short bullet text:
- "Stand tall, hands on hips, try a simple forward fold"
- "Pulling in the back of the thighs or lower back strain = hips need attention"
- "Stiff getting up from a chair = a signal"

Section 2 on the upper right: a number badge "2" beside a warm-up icon with motion lines. Heading: "Simple Warm-Up Moves to Prepare Your Body Safely". Show three mini icon blocks in a row:
- "Hip circles" with circular arrows and text "10 slow rotations each direction"
- "Marching in place" with knee-lift icon and text "30 seconds"
- "Cat-Cow" with a cat-cow spine icon and text "5 gentle breath-linked rounds"

Section 3 across the lower left: a number badge "3" beside a breathing lungs icon and subtle airflow lines. Heading: "Key Breathing Techniques to Deepen Each Stretch". Include two lines of text:
- "Inhale to create space"
- "Exhale to soften and sink deeper"
Add a small warning-style note with a calm tone: "Forcing a stretch while holding your breath only creates resistance."

Section 4 across the lower right: a number badge "4" beside a props icon showing a yoga block, blanket, and strap. Heading: "Props That Make Poses More Accessible and Effective". Use a simple table-style layout with three rows:
- "Yoga blocks" — "Elevating hips in Pigeon"
- "Blanket" — "Cushioning knees in Low Lunge"
- "Strap" — "Reaching feet in Happy Baby"
Add a final line beneath the table: "They're not shortcuts, they're smart tools."

Use clear visual hierarchy, bold subheadings, concise body text, and simple line icons. Keep the layout airy and professional with strong section dividers and readable typography.

How to Recognize Your Personal Hip Tightness Level

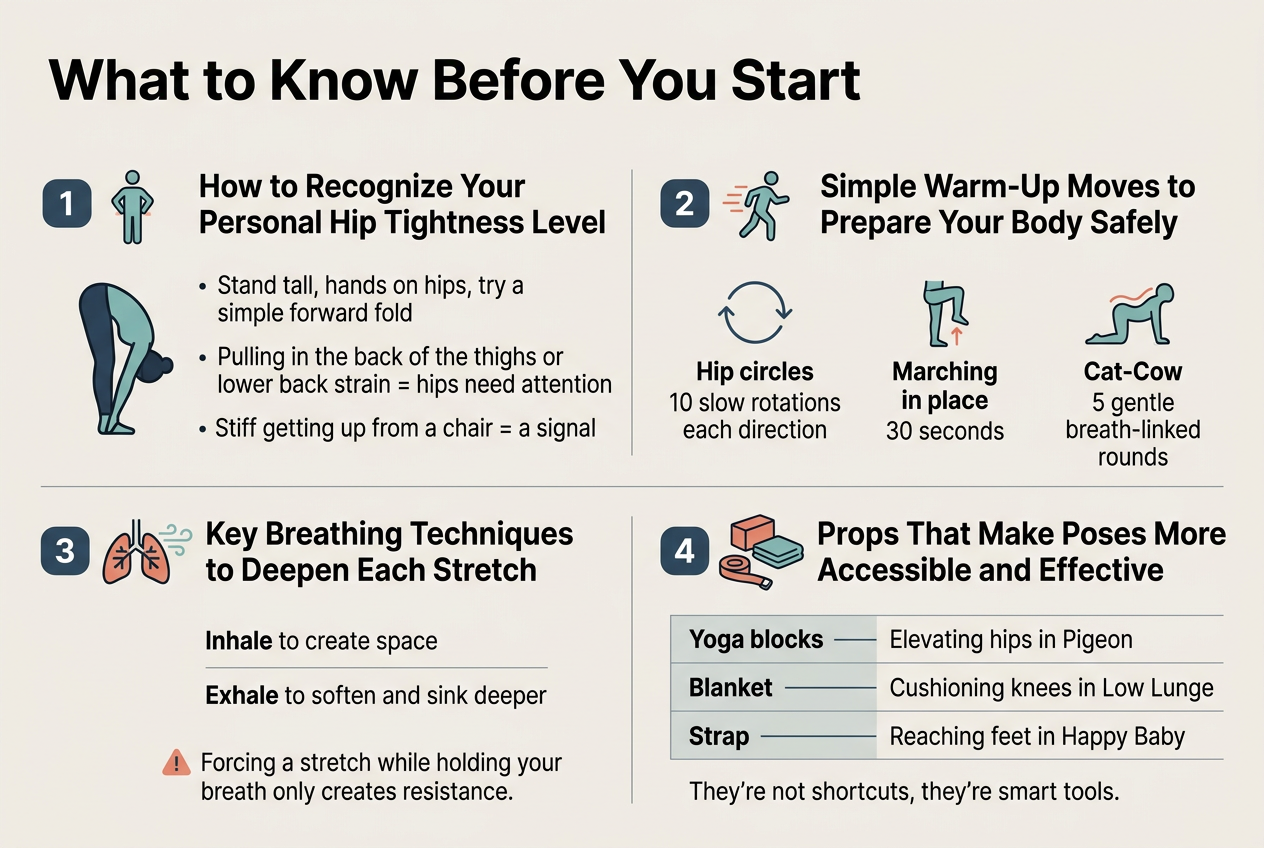
Before jumping into poses, I check in with my body first. I stand tall, place my hands on my hips, and try a simple forward fold. If I feel pulling in the back of my thighs or lower back strain, my hips are screaming for attention. I also notice during daily life — does getting up from a chair feel stiff? That’s my signal.

Simple Warm-Up Moves to Prepare Your Body Safely

I never skip a warm-up. Two minutes of these gets blood flowing:

  • Hip circles — 10 slow rotations each direction
  • Marching in place — lift knees high for 30 seconds
  • Cat-Cow — 5 gentle breath-linked rounds on all fours

Key Breathing Techniques to Deepen Each Stretch

I breathe into the tight spot. Inhale to create space, exhale to soften and sink deeper. Forcing a stretch while holding my breath only creates resistance.

Props That Make Poses More Accessible and Effective

PropBest Used For
Yoga blocksElevating hips in Pigeon
BlanketCushioning knees in Low Lunge
StrapReaching feet in Happy Baby

I keep these nearby — they’re not shortcuts; they’re smart tools.

Pose 1: Low Lunge for Deep Hip Flexor Relief
Create a clean professional infographic illustration in a full-bleed 3:2 landscape layout, with a soft calming wellness palette of sage green, teal, warm beige, and white, using modern sans-serif typography with a bold title and clear visual hierarchy.

Top header across the full width:
"Pose 1: Low Lunge for Deep Hip Flexor Relief"
Add a subtle yoga pose illustration on the right side of the header: a person in a low lunge, torso upright, front knee over ankle, back knee on the mat, with gentle motion lines and a soft blue highlight around the hip flexor area.

Main body split into three wide horizontal sections or two-column blocks, not a vertical poster.

Left large section titled:
"Step-by-Step Instructions"
Use six numbered circles with small yoga/pose icons beside each point and a simple flow from 1 to 6:
1. "Start in a tabletop position on all fours."
2. "Step my right foot forward between my hands, aligning my knee directly over my ankle."
3. "Slide my left knee back until I feel a gentle pull along my left hip flexor."
4. "Press my fingertips into the mat for balance, then lift my torso upright."
5. "Tuck my back toes under or rest the top of my foot flat on the mat."
6. "Hold for 30–60 seconds, breathing deeply into the stretch, then switch sides."

Right upper section titled:
"Adjustments for Tight or Sensitive Hips"
Use three small icon callouts with a folded blanket, yoga blocks, and a lowered torso:
- "Use a folded blanket under my back knee if I feel pressure on the kneecap."
- "Place blocks under both hands to reduce how deep I sink into the lunge."
- "Keep my torso lower if lifting upright creates too much intensity right away."

Bottom wide section titled:
"Benefits of Regular Practice"
Show three benefit icons in a row: posture, lower back, walking stride. Include this text:
"Regular low lunge practice directly targets the psoas and iliacus—the hip flexors that get extremely compressed from long hours of sitting. Over time, I notice better posture, reduced lower back ache, and noticeably longer, more fluid strides when walking."

Use clean divider lines, soft rounded boxes for each section, and balanced spacing. Include small minimalist symbols: numbered badges, knee icon, block icon, blanket icon, spine icon, and walking stride icon. Keep all text crisp, legible, and exactly as written.

Step-by-Step Instructions to Get Into the Pose Correctly

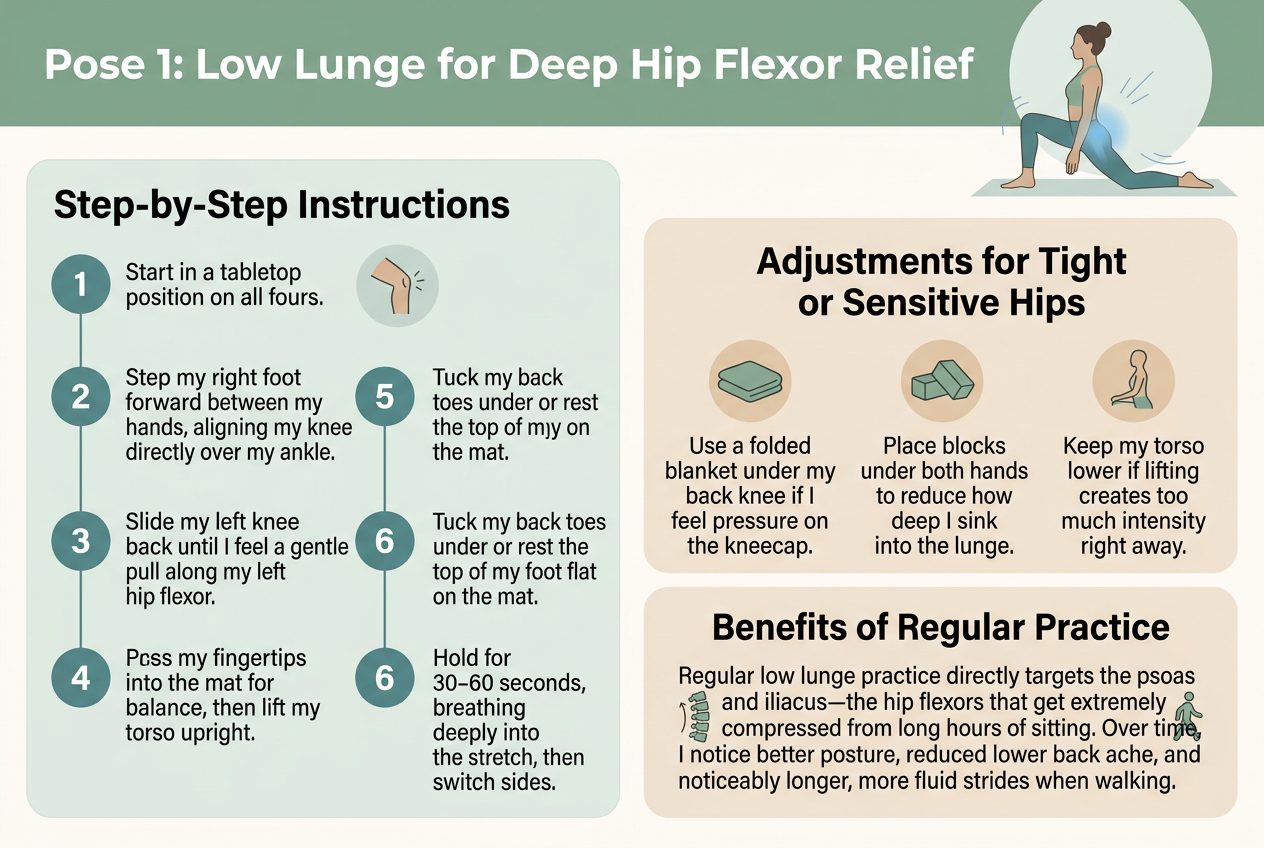
  1. Start in a tabletop position on all fours.
  2. Step my right foot forward between my hands, aligning my knee directly over my ankle.
  3. Slide my left knee back until I feel a gentle pull along my left hip flexor.
  4. Press my fingertips into the mat for balance, then lift my torso upright.
  5. Tuck my back toes under or rest the top of my foot flat on the mat.
  6. Hold for 30–60 seconds, breathing deeply into the stretch, then switch sides.

How to Adjust the Pose for Tight or Sensitive Hips

  • Use a folded blanket under my back knee if I feel pressure on the kneecap.
  • Place blocks under both hands to reduce how deep I sink into the lunge.
  • Keep my torso lower if lifting upright creates too much intensity right away.

Benefits Gained from Regular Practice of This Pose

Regular low lunge practice directly targets the psoas and iliacus—the hip flexors that get extremely compressed from long hours of sitting. Over time, I notice better posture, reduced lower back ache, and noticeably longer, more fluid strides when walking.

Pose 2: Pigeon Pose to Unlock Deep Glute Tension
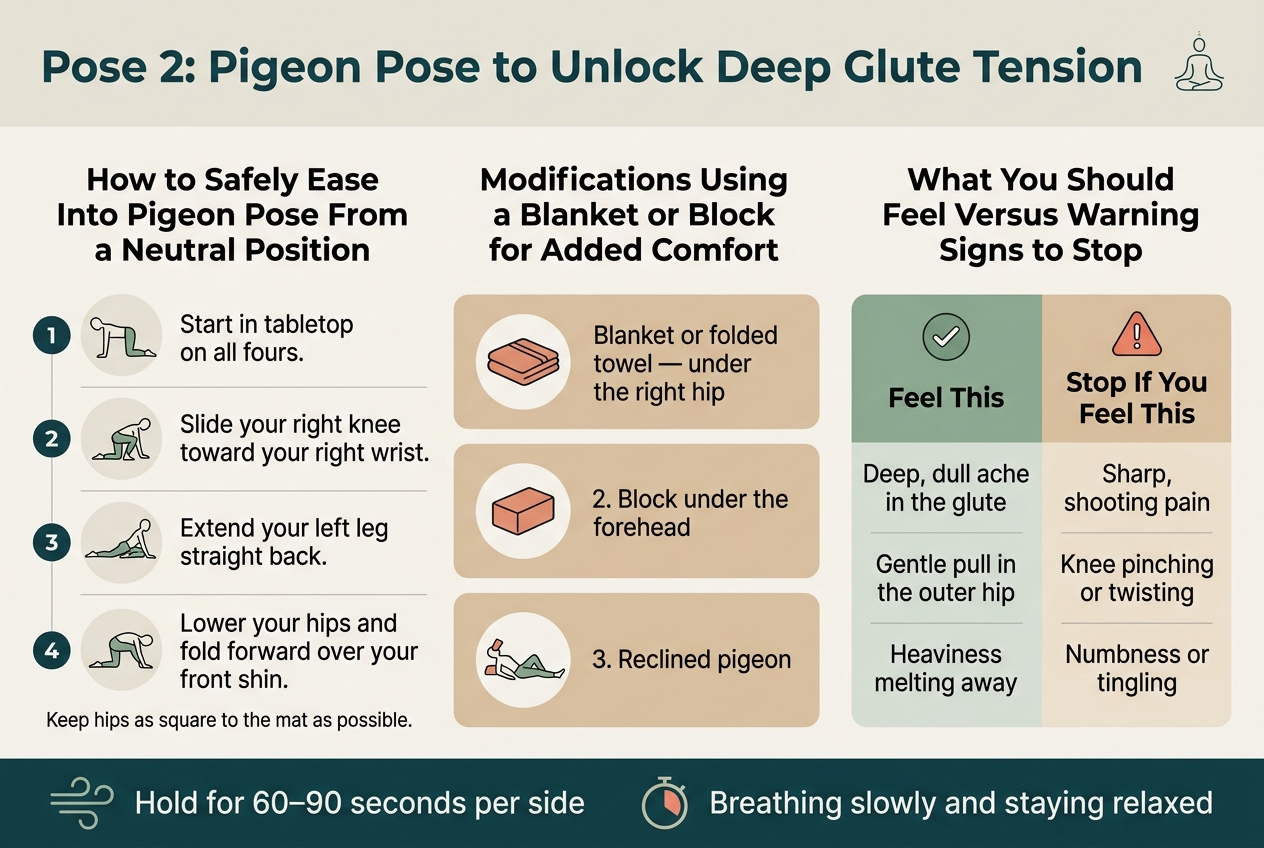
Create a clean, professional fitness infographic in a 3:2 aspect ratio, full-bleed layout, wide horizontal composition with no inset frame. Use a soft neutral background with calm yoga-inspired colors: deep teal, sage green, warm beige, and coral accent. Use modern sans-serif typography with bold heading and clear section hierarchy. 

Top across the full width: large bold title in dark teal text: "Pose 2: Pigeon Pose to Unlock Deep Glute Tension" with a small minimalist yoga icon beside it.

Main body in three wide sections arranged left to right:

Left section: a numbered step-by-step block with a small circular icon for each step.
Heading text: "How to Safely Ease Into Pigeon Pose From a Neutral Position"
Show 4 numbered steps with simple line-art pose icons:
1. "Start in tabletop on all fours."
2. "Slide your right knee toward your right wrist."
3. "Extend your left leg straight back."
4. "Lower your hips and fold forward over your front shin."
Add a small note under the steps: "Keep hips as square to the mat as possible."

Center section: a modifications block with three stacked horizontal cards, each with a clear icon.
Heading text: "Modifications Using a Blanket or Block for Added Comfort"
Card 1 with a folded blanket icon and text: "Blanket or folded towel — under the right hip"
Card 2 with a yoga block icon and text: "Block under the forehead"
Card 3 with a reclined pose icon and text: "Reclined pigeon"

Right section: a two-column feel-versus-stop comparison panel with checkmark and warning icons.
Heading text: "What You Should Feel Versus Warning Signs to Stop"
Left column label with green check icon: "Feel This"
- "Deep, dull ache in the glute"
- "Gentle pull in the outer hip"
- "Heaviness melting away"
Right column label with red warning icon: "Stop If You Feel This"
- "Sharp, shooting pain"
- "Knee pinching or twisting"
- "Numbness or tingling"

Bottom wide footer band across the full width with a breathing icon and timer symbol:
"Hold for 60–90 seconds per side"
"Breathing slowly and staying relaxed"

Use clear spacing, subtle divider lines, and strong visual hierarchy. Keep the layout airy, readable, and balanced, with icons and text aligned neatly in wide sections.

How to Safely Ease Into Pigeon Pose From a Neutral Position

I always start in a tabletop position on all fours. From there, I slide my right knee forward toward my right wrist, angling my shin slightly across the mat. My left leg extends straight back. I gently lower my hips, keeping them as square to the mat as possible. Then I fold forward over my front shin, resting on my forearms or a stacked fist.

Modifications Using a Blanket or Block for Added Comfort

My hips rarely touch the mat evenly at first — that’s completely normal. Here’s what I reach for:

  • Blanket or folded towel — placed under the right hip to level things out
  • Block under the forehead — great when folding forward feels straining on the neck
  • Reclined pigeon — my go-to when the floor version feels like too much

What You Should Feel Versus Warning Signs to Stop

Feel ThisStop If You Feel This
Deep, dull ache in the gluteSharp, shooting pain
Gentle pull in the outer hipKnee pinching or twisting
Heaviness melting awayNumbness or tingling

I hold for 60–90 seconds per side, breathing slowly and staying relaxed.

Pose 3: Butterfly Pose for Inner Thigh and Groin Release
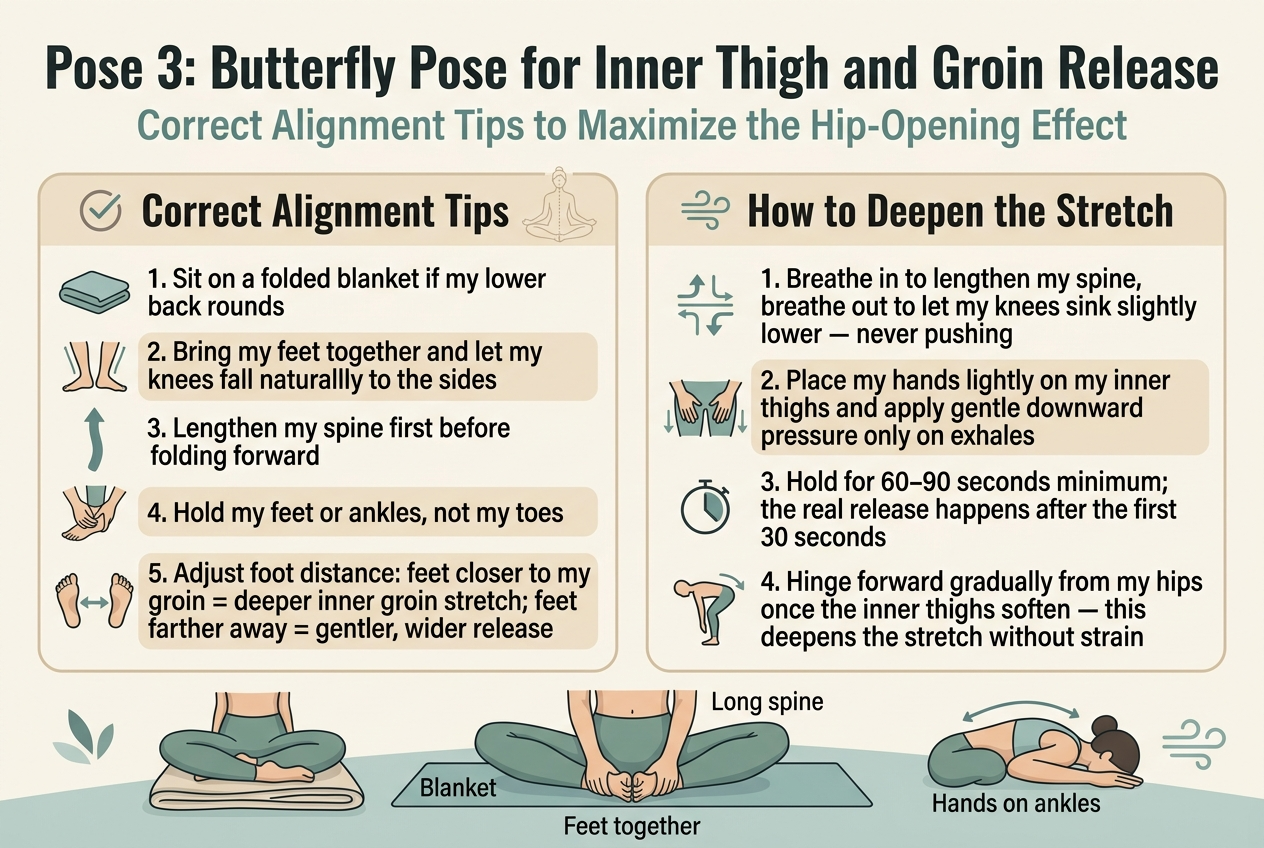
Create a full-bleed 3:2 landscape infographic in a clean modern wellness style, with a soft cream background, muted teal and sage green accents, warm beige highlight panels, and dark charcoal sans-serif typography. Use a wide horizontal layout with strong visual hierarchy, no poster frame, no inset margins, and no narrow vertical stack.

Top header across the full width:
Bold title in large dark charcoal text: "Pose 3: Butterfly Pose for Inner Thigh and Groin Release"
Subtitle in smaller muted teal text: "Correct Alignment Tips to Maximize the Hip-Opening Effect"

Main layout: two wide sections side by side across the center, each in a rounded rectangle panel with subtle line-art yoga illustrations and clear icons.

LEFT PANEL title with a small checkmark icon:
"Correct Alignment Tips"
Use 5 numbered points with small icons beside each point:
1. "Sit on a folded blanket if my lower back rounds" — icon of a folded blanket under seated hips
2. "Bring my feet together and let my knees fall naturally to the sides" — icon of feet touching with knees open
3. "Lengthen my spine first before folding forward" — icon of an upright spine arrow
4. "Hold my feet or ankles, not my toes" — icon of hands holding ankles
5. "Adjust foot distance: feet closer to my groin = deeper inner groin stretch; feet farther away = gentler, wider release" — icon showing two foot-position options with arrows

RIGHT PANEL title with a small breath icon:
"How to Deepen the Stretch"
Use 4 numbered points with calm breathing and pressure icons:
1. "Breathe in to lengthen my spine, breathe out to let my knees sink slightly lower — never pushing" — icon of inhale/exhale arrows
2. "Place my hands lightly on my inner thighs and apply gentle downward pressure only on exhales" — icon of hands on inner thighs with subtle downward arrows
3. "Hold for 60–90 seconds minimum; the real release happens after the first 30 seconds" — icon of a clock or timer
4. "Hinge forward gradually from my hips once the inner thighs soften — this deepens the stretch without strain" — icon of a hip hinge arrow and forward fold silhouette

Bottom strip spanning the full width with a calming visual:
Include a wide horizontal illustration of Butterfly Pose seated on a folded blanket, feet together, knees open, spine long, with subtle labels near the body: "Blanket", "Feet together", "Long spine", "Hands on ankles". Add small decorative leaf or breath-wave accents, keeping the design uncluttered.

Typography: bold condensed heading, clean readable body text, strong contrast, balanced spacing, professional fitness/yoga infographic style, crisp vector illustration, soft shadows, minimal but polished.

Correct Alignment Tips to Maximize the Hip-Opening Effect

Getting the alignment right in Butterfly Pose makes a huge difference in what I actually feel.

  • Sit on a folded blanket if my lower back rounds — this tilts my pelvis forward and opens the groin more effectively
  • Bring my feet together and let my knees fall naturally to the sides — I never force them down
  • Lengthen my spine first before folding forward; a slouched back shifts the stretch away from my hips
  • Hold my feet or ankles, not my toes, to keep my shoulders relaxed
  • Adjust foot distance: feet closer to my groin = deeper inner groin stretch; feet farther away = gentler, wider release

How to Use Gentle Pressure to Progressively Deepen the Stretch

I think of deepening this pose as a slow conversation with my body, not a negotiation I force.

  • Breathe in to lengthen my spine, breathe out to let my knees sink slightly lower — never pushing
  • Place my hands lightly on my inner thighs and apply gentle downward pressure only on exhales
  • Hold for 60–90 seconds minimum; the real release happens after the first 30 seconds
  • Hinge forward gradually from my hips once the inner thighs soften — this deepens the stretch without strain

Pose 4: Figure Four Pose for Targeted Outer Hip Relief
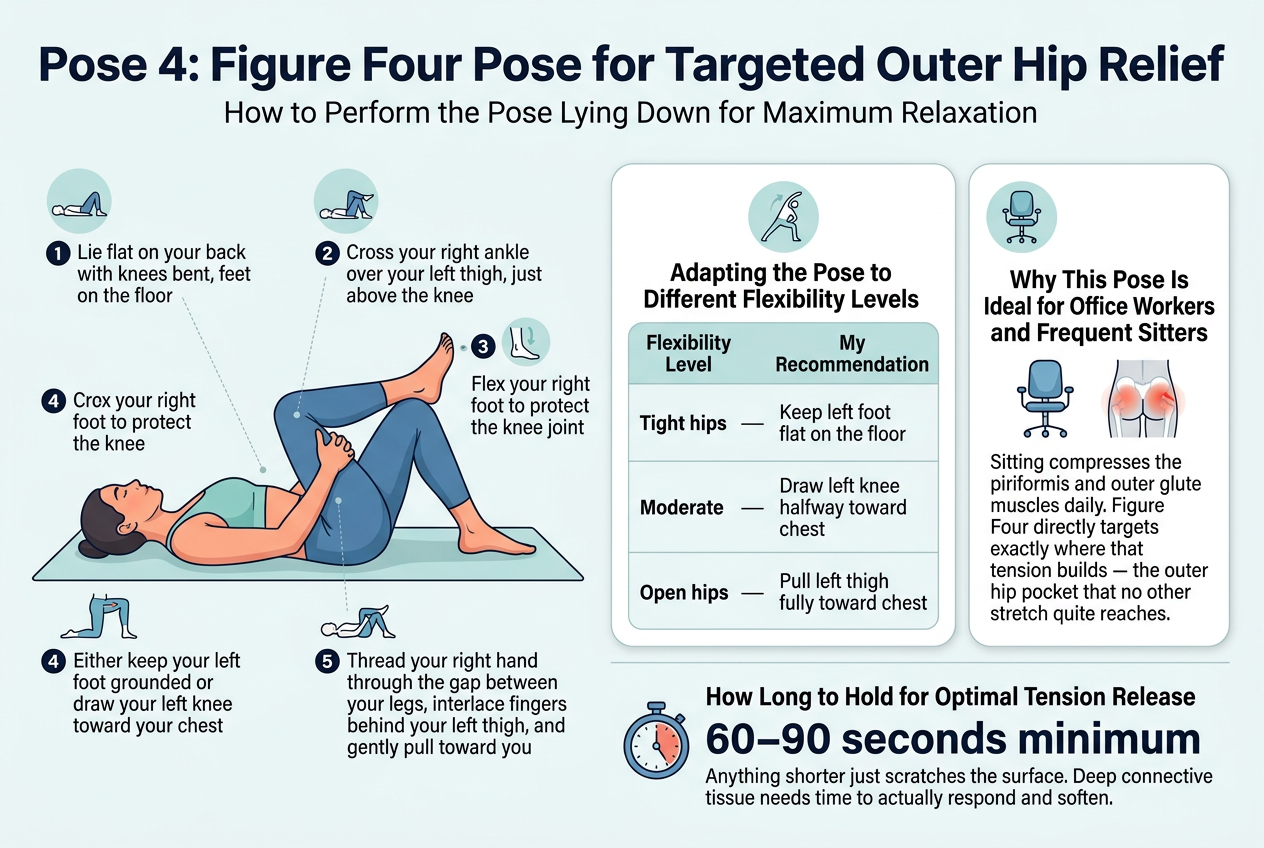
Create a clean, professional full-bleed infographic illustration in a 3:2 aspect ratio about yoga stretching.

Top header across the full width: bold title in dark navy sans-serif text, "Pose 4: Figure Four Pose for Targeted Outer Hip Relief". Add a small subtitle beneath it in lighter text: "How to Perform the Pose Lying Down for Maximum Relaxation".

Main layout: wide horizontal, split into three sections.

Left section: a large illustrated yoga figure lying on a mat, shown in Figure Four Pose. Include 5 numbered step callouts with small icons:
1. "Lie flat on your back with knees bent, feet on the floor"
2. "Cross your right ankle over your left thigh, just above the knee"
3. "Flex your right foot to protect the knee joint"
4. "Either keep your left foot grounded or draw your left knee toward your chest"
5. "Thread your right hand through the gap between your legs, interlace fingers behind your left thigh, and gently pull toward you"

Center section: a flexibility guide in a clean 3-row table with a small stretching icon. Title: "Adapting the Pose to Different Flexibility Levels". Table columns: "Flexibility Level" and "My Recommendation". Rows:
"Tight hips" — "Keep left foot flat on the floor"
"Moderate" — "Draw left knee halfway toward chest"
"Open hips" — "Pull left thigh fully toward chest"

Right section: a benefit panel with an office chair icon and a hip/glute highlight diagram. Heading: "Why This Pose Is Ideal for Office Workers and Frequent Sitters". Body text: "Sitting compresses the piriformis and outer glute muscles daily. Figure Four directly targets exactly where that tension builds — the outer hip pocket that no other stretch quite reaches."

Bottom band across the full width: a timer icon and bold hold-time statement. Heading: "How Long to Hold for Optimal Tension Release". Emphasize the number in large bold text: "60–90 seconds minimum". Add smaller text beneath: "Anything shorter just scratches the surface. Deep connective tissue needs time to actually respond and soften."

Design style: modern wellness infographic, clean white background, soft teal, blue, and coral accents, subtle gray lines, clear hierarchy, rounded cards, crisp vector illustrations, readable sans-serif typography, balanced spacing, no vertical poster layout, no inset border frame.

How to Perform the Pose Lying Down for Maximum Relaxation

I love this pose because it keeps my whole body relaxed on the mat. Here’s how I do it:

  • Lie flat on your back with knees bent, feet on the floor
  • Cross your right ankle over your left thigh, just above the knee
  • Flex your right foot to protect the knee joint
  • Either keep your left foot grounded or draw your left knee toward your chest
  • Thread your right hand through the gap between your legs, interlace fingers behind your left thigh, and gently pull toward you

Adapting the Pose to Different Flexibility Levels

Flexibility LevelMy Recommendation
Tight hipsKeep left foot flat on the floor
ModerateDraw left knee halfway toward chest
Open hipsPull left thigh fully toward chest

Why This Pose Is Ideal for Office Workers and Frequent Sitters

Sitting compresses the piriformis and outer glute muscles daily. I find Figure Four targets exactly where that tension builds—the outer hip pocket that no other stretch quite reaches.

How Long to Hold for Optimal Tension Release

I hold each side for at least 60–90 seconds. Anything shorter just scratches the surface. Deep connective tissue needs time to actually respond and soften.

Pose 5: Happy Baby Pose to Reset and Relax the Entire Hip
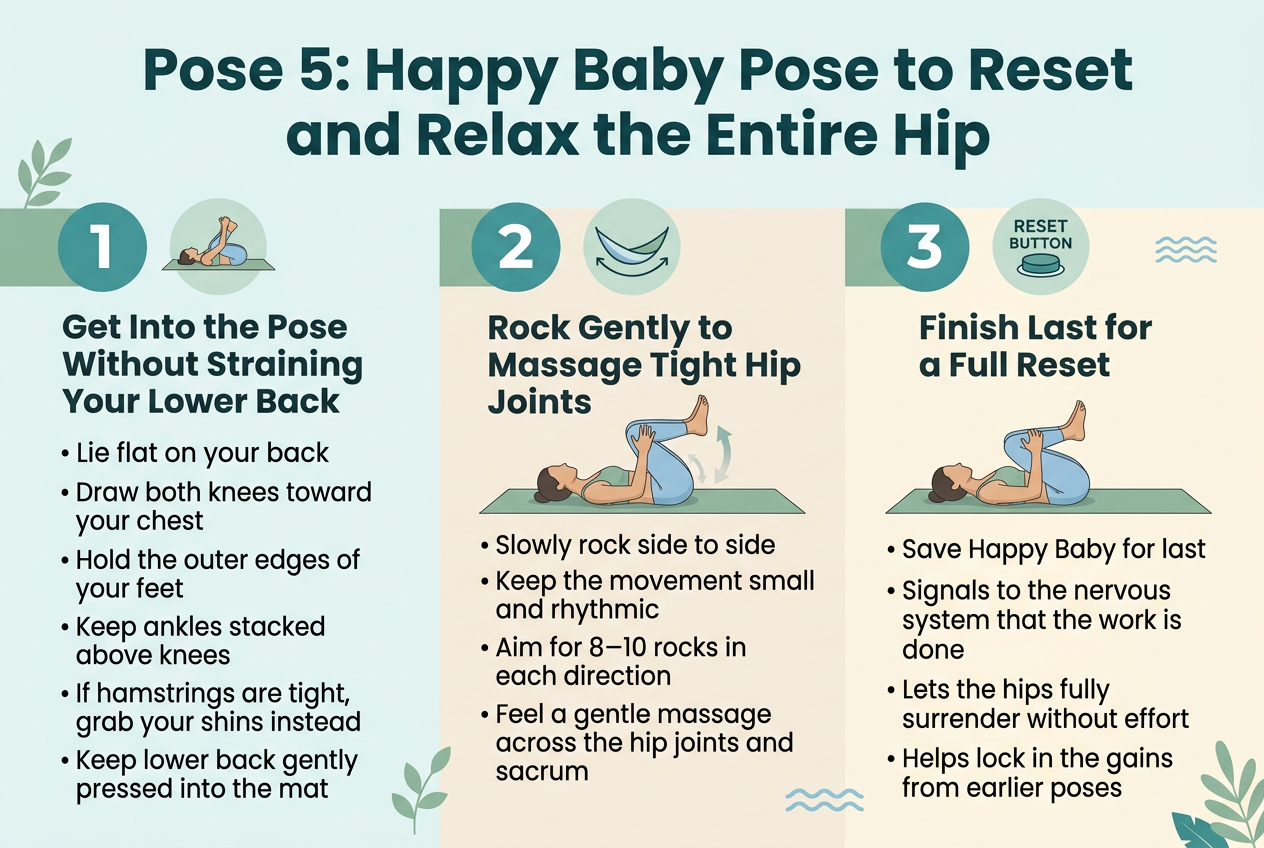
Create a clean, professional yoga infographic in a 3:2 landscape aspect ratio, full-bleed layout, no frame, no inset margins. Use a soft calming palette of teal, sage green, light blue, and warm cream with dark charcoal text. Modern sans-serif fonts with a bold title and clear section headings.

Top across the full width: large bold heading in dark teal text: "Pose 5: Happy Baby Pose to Reset and Relax the Entire Hip"

Center the infographic in three wide horizontal sections or three side-by-side blocks, each with a simple icon and numbered label.

Section 1 on the left:
- Large number "1" in a teal circle
- Small flat icon of a person lying on their back holding their feet
- Heading: "Get Into the Pose Without Straining Your Lower Back"
- Short bullet text:
  • "Lie flat on your back"
  • "Draw both knees toward your chest"
  • "Hold the outer edges of your feet"
  • "Keep ankles stacked above knees"
  • "If hamstrings are tight, grab your shins instead"
  • "Keep lower back gently pressed into the mat"
- Show a simple yoga figure on a mat with knees bent and hands on feet, lower back touching the mat

Section 2 in the center:
- Large number "2" in a teal circle
- Small flat icon of curved arrows or a gentle rocking hammock
- Heading: "Rock Gently to Massage Tight Hip Joints"
- Short bullet text:
  • "Slowly rock side to side"
  • "Keep the movement small and rhythmic"
  • "Aim for 8–10 rocks in each direction"
  • "Feel a gentle massage across the hip joints and sacrum"
- Show a subtle side-to-side motion graphic with soft curved arrows around the hips

Section 3 on the right:
- Large number "3" in a teal circle
- Small flat icon of a calm reset button or relaxed figure
- Heading: "Finish Last for a Full Reset"
- Short bullet text:
  • "Save Happy Baby for last"
  • "Signals to the nervous system that the work is done"
  • "Lets the hips fully surrender without effort"
  • "Helps lock in the gains from earlier poses"
- Add a small badge or button-like graphic with the words: "RESET BUTTON"

Use a balanced, airy layout with clear spacing, simple illustrated yoga figure, soft shadow accents, and small decorative leaf or wave motifs. Keep all text legible, aligned, and neatly organized.

How to Get Into the Pose Without Straining Your Lower Back

I start by lying flat on my back, then draw both knees toward my chest. I reach up and grab the outer edges of my feet, keeping my ankles stacked directly above my knees. If my hamstrings are tight, I grab my shins instead — no shame in that. My lower back stays pressed gently into the mat throughout, which protects it completely.

Ways to Rock Gently to Massage Tight Hip Joints

Once I’m settled, I slowly rock side to side like a hammock. This gentle motion does what a static hold can’t—it creates a natural massage effect across the hip joints and sacrum. I keep the movement small and rhythmic, almost like a slow pendulum. About 8–10 rocks in each direction feels perfect.

Why Ending Your Routine With This Pose Enhances Overall Results

I always save Happy Baby for last because it signals to my nervous system that the work is done. After all that active stretching, this pose lets my hips fully surrender without effort. My body absorbs the benefits of every previous pose more deeply when I finish here — it’s basically a reset button that locks in all the gains.

How to Build a Sustainable Hip-Opening Routine
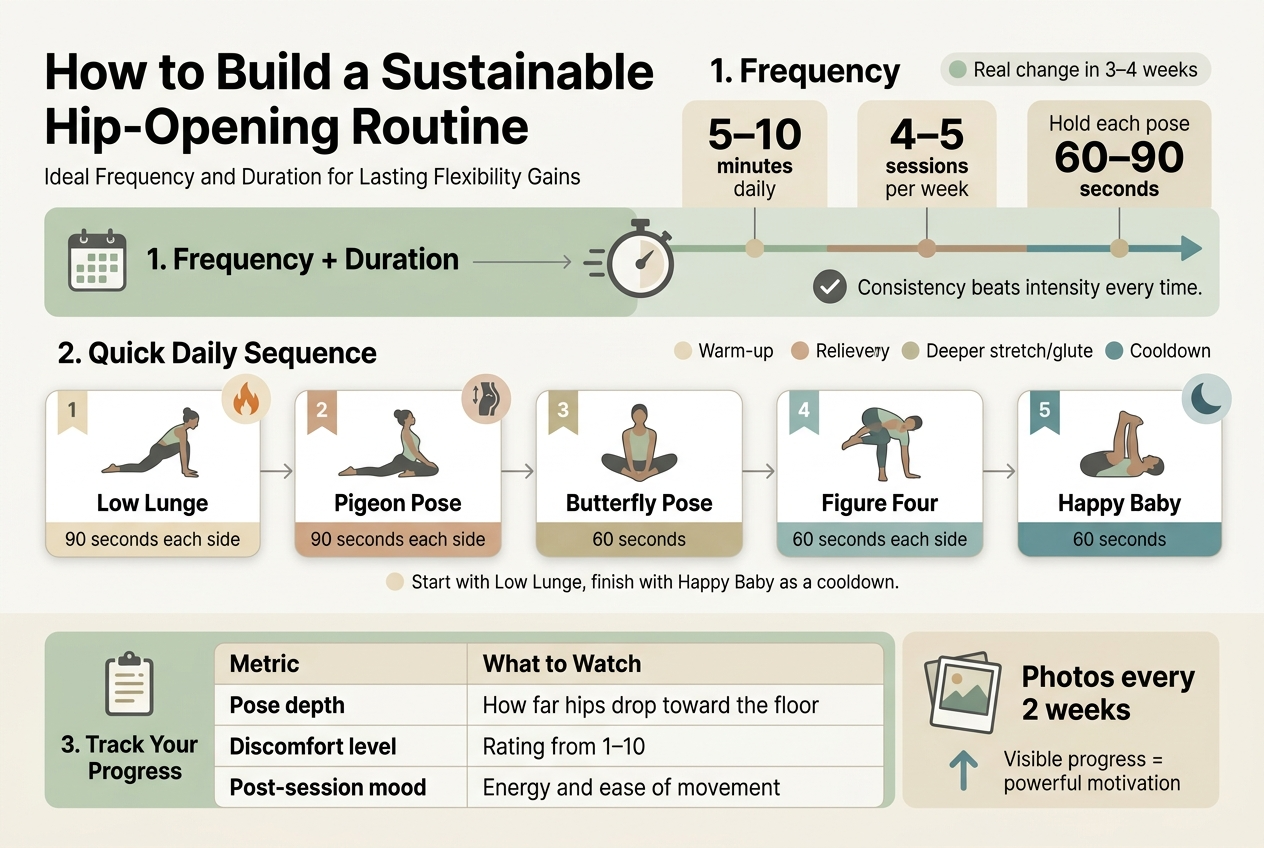
Create a clean, professional full-bleed infographic in a 3:2 aspect ratio with a modern wellness aesthetic, using soft sage green, warm beige, muted teal, and charcoal text on an off-white background. Use a bold sans-serif title at the top left: "How to Build a Sustainable Hip-Opening Routine". Place a small subtitle beneath it in lighter weight: "Ideal Frequency and Duration for Lasting Flexibility Gains".

Arrange the infographic in three wide horizontal sections with clear visual hierarchy and simple flat vector icons.

Top section: a wide left-to-right timeline with a calendar icon, stopwatch icon, and progress line.
Include a bold heading: "1. Frequency + Duration"
Use three highlighted stat blocks across the section:
- "5–10 minutes daily"
- "4–5 sessions per week"
- "Hold each pose 60–90 seconds"
Add a small note in a rounded pill: "Real change in 3–4 weeks"
Use a checkmark icon next to "Consistency beats intensity every time."

Middle section: a two-column sequence grid with numbered pose cards, each card containing a simple illustrated yoga pose silhouette icon and duration text.
Heading: "2. Quick Daily Sequence"
Show five cards in order from left to right, each with a small number badge and colored accent band:
1. Low Lunge — "90 seconds each side"
2. Pigeon Pose — "90 seconds each side"
3. Butterfly Pose — "60 seconds"
4. Figure Four — "60 seconds each side"
5. Happy Baby — "60 seconds"
Add a thin flow arrow between cards. Include a small note under the sequence: "Start with Low Lunge, finish with Happy Baby as a cooldown."
Add a small warm-up flame icon near Low Lunge, a deeper stretch/glute icon near Pigeon Pose, and a cooldown moon icon near Happy Baby.

Bottom section: a wide progress-tracking panel split into two parts.
Left side: a simple table with a clipboard icon and the heading "3. Track Your Progress"
Table columns exactly labeled:
"Metric" and "What to Watch"
Rows:
"Pose depth" — "How far hips drop toward the floor"
"Discomfort level" — "Rating from 1–10"
"Post-session mood" — "Energy and ease of movement"
Right side: a photo-frame icon with the text "Photos every 2 weeks" and a small upward arrow with the caption "Visible progress = powerful motivation"

Use crisp spacing, rounded rectangles, subtle shadows, and clear readable typography. Keep all text left-aligned within sections, with strong section headers and bold numbers. No decorative borders, no vertical poster layout, no centered narrow stack.

Ideal Frequency and Duration for Lasting Flexibility Gains

Consistency beats intensity every time. I’ve found that 5–10 minutes daily produces far better results than one long weekly session. Aim for at least 4–5 sessions per week, holding each pose for 60–90 seconds. Within 3–4 weeks, you’ll notice real, measurable change.

How to Combine These Poses Into a Quick Daily Sequence

I run through all five poses in under 12 minutes by following this order:

  1. Low Lunge – 90 seconds each side
  2. Pigeon Pose – 90 seconds each side
  3. Butterfly Pose – 60 seconds
  4. Figure Four – 60 seconds each side
  5. Happy Baby – 60 seconds

Start with Low Lunge to warm up the hip flexors first, then work deeper into the glutes and inner hips. Happy Baby at the end acts as a natural cooldown.

Tracking Your Progress to Stay Motivated and Consistent

I keep a simple weekly log noting:

MetricWhat to Watch
Pose depthHow far hips drop toward the floor
Discomfort levelRating from 1–10
Post-session moodEnergy and ease of movement

Photos every two weeks help too — visible progress is a powerful motivator.
3:2 landscape infographic, full-bleed layout, clean modern fitness design, light background with soft blue and teal accents, bold sans-serif typography, high contrast, professional medical-wellness style.

Top header across the full width:
Large bold title text: "Conclusion"
Smaller subtitle text beneath: "Consistency over intensity for happier hips"

Main body in a wide 3-column layout with clear visual hierarchy:

Left section, large text block with a seated desk icon:
Heading text: "Sitting all day tightens the hips"
Supporting text: "Hours at a desk can take a real toll, and ignoring tightness can make it worse over time."
Use a blue chair and clock icon.

Center section, 5 horizontal mini cards arranged in two rows:
Card 1: "Low Lunge" with a lunge/stretch silhouette icon
Card 2: "Pigeon Pose" with a hip-opening yoga pose icon
Card 3: "Butterfly" with knees-open seated stretch icon
Card 4: "Figure Four" with crossed-leg hip stretch icon
Card 5: "Happy Baby" with a reclined stretch icon
Each card uses a small colored icon circle and a short label only.

Right section, large emphasized callout with a calendar and checkmark icon:
Heading text: "10–15 minutes is enough"
Supporting text: "A few minutes after a long day can make a noticeable difference."
Secondary text below in a highlighted box: "10 to 15 minutes, a few times a week"

Bottom wide banner spanning the full width with three simple icon-text steps, separated by vertical dividers:
1. "Pick one or two poses"
2. "Build from what feels good"
3. "Listen to your body"
Use small numbered circles beside each step and gentle checkmark icons.

Footer message in a bold accent strip at the bottom:
Text: "Your hips will thank you."

Use airy spacing, balanced alignment, subtle line dividers, rounded rectangles, and clear section labels. No extra text beyond the specified wording.

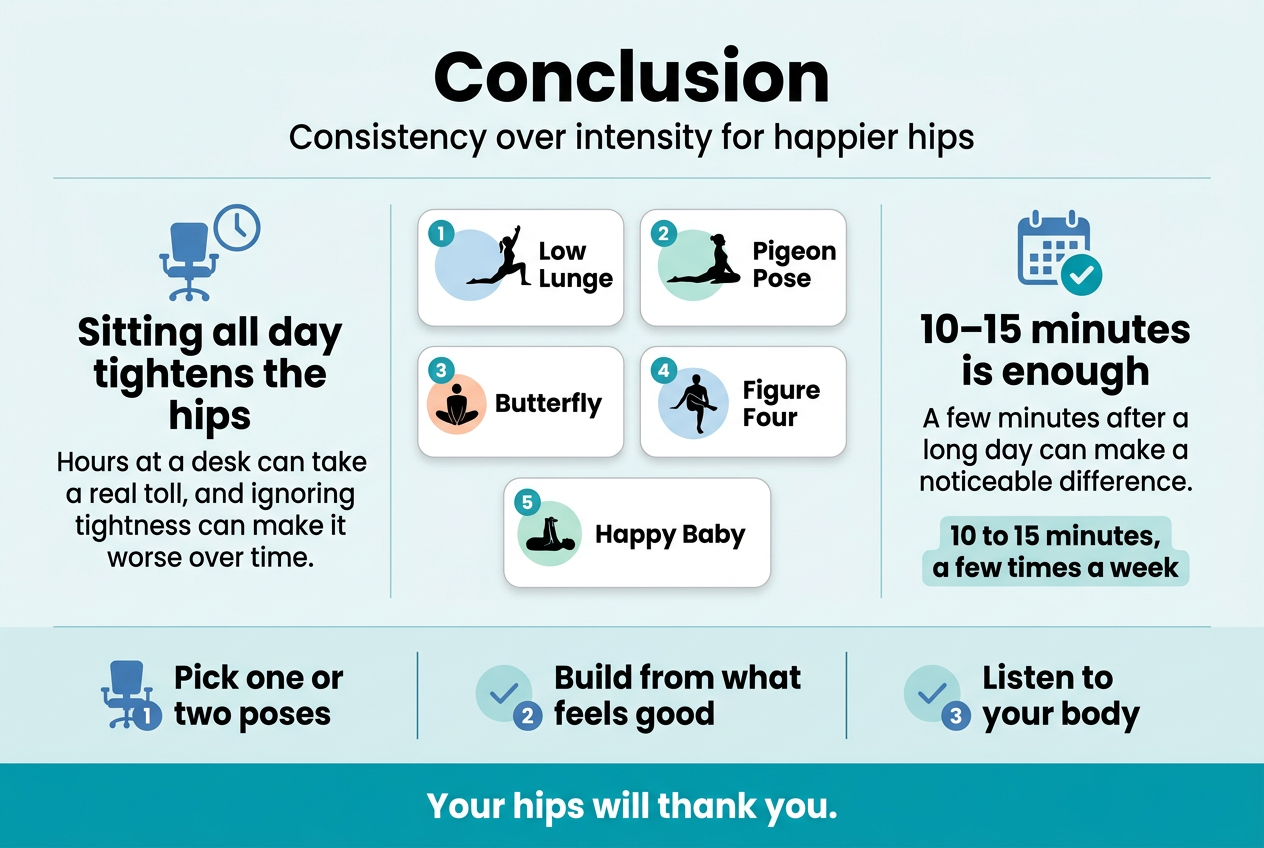
Sitting for hours every day takes a real toll on the hips, and I’ve found that ignoring that tightness only makes things worse over time. The five poses I shared — Low Lunge, Pigeon Pose, Butterfly, Figure Four, and Happy Baby — each target a different part of the hip complex, so together they cover a lot of ground. Even a few minutes of these after a long day at my desk have made a noticeable difference in how I move and feel.

For me, the key has been consistency over intensity. I don’t need a full hour-long session to see results — even 10 to 15 minutes a few times a week adds up. If you’re ready to stop living with that nagging hip tightness, pick one or two of these poses and start there. Build from what feels good, listen to your body, and make it a regular part of your routine. Your hips will thank you.

✨ Join The Zen Journal community — get fresh yoga and wellness insights straight to your inbox ✨